CanopyCode™
User guide
Everything CanopyCode does inside AutoCAD, from CSV import to final deliverables: protection-zone calculations, impact analysis, tables, legends, and labels.
On this page
Getting Started
Welcome to CanopyCode - an AutoCAD plugin that automates tree protection plans for landscape architects and civil engineers. From CSV import to final deliverables, CanopyCode handles protection zone calculations, impact analysis, layer routing, tables, legends, and labels - all inside AutoCAD.
Install
Run the CanopyCode MSI installer and restart AutoCAD. The CanopyCode ribbon tab appears automatically.
Load (if needed)
If the ribbon tab doesn’t appear after installation, type NETLOAD at the AutoCAD command line and browse to CanopyCode.AutoCAD.dll.
Activate
Type CC_ACTIVATE and enter your license key. CanopyCode includes a 7-day offline grace period, so you can work without internet temporarily.
Supported Versions
- AutoCAD / Civil 3D 2024 - .NET Framework 4.8
- AutoCAD / Civil 3D 2025-2026 - .NET 8.0
Preparing Your CSV File
CanopyCode imports tree data from a CSV (comma-separated values) file. Most tree survey exports need only minor adjustments before importing.
Save as CSV - If you're exporting from Excel, choose CSV UTF-8 (Comma delimited). Regular CSV (Comma delimited) also works. Avoid .xlsx, tab-delimited, or Macintosh/MS-DOS formats.
One common edit: tree surveys often include separate columns for Common Name and Botanical Name. CanopyCode uses a single Species column, so pick whichever name you prefer (common name is typical for tree protection plans), rename that column to "Species" (or map it during import or add a custom column name), and you're good to go.
Classification columns: If you've set up classification groups (like Specimen or Protected) in the Classification tab, add a matching column to your CSV to pre-tag trees during import. The column name should match your group name exactly. Alternatively, a generic Classification column works as a fallback for all groups. You can also skip this entirely and assign classifications after import using Edit Tree Data (CC_EDIT_TREE_DATA).
Required Columns
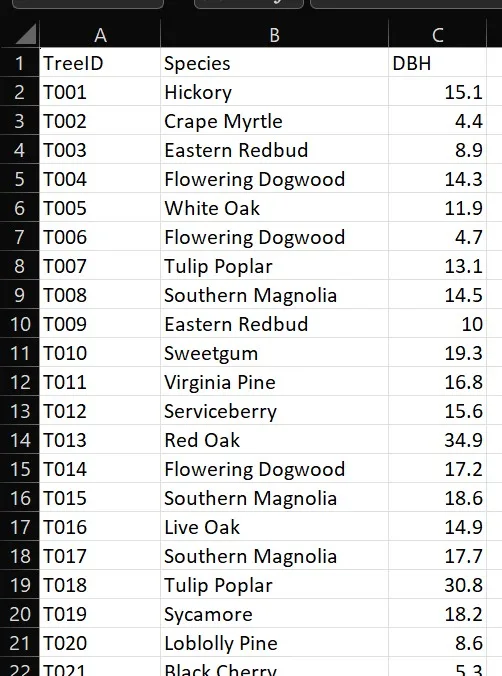
| Column | What It Is | Example Values |
|---|---|---|
| TreeID | Unique identifier for each tree | T001, T002, Tree-1 |
| Species | Tree species name | Live Oak, Red Maple |
| DBH | Diameter at breast height (inches) | 24.5, 12, 36.0 |
Optional Columns
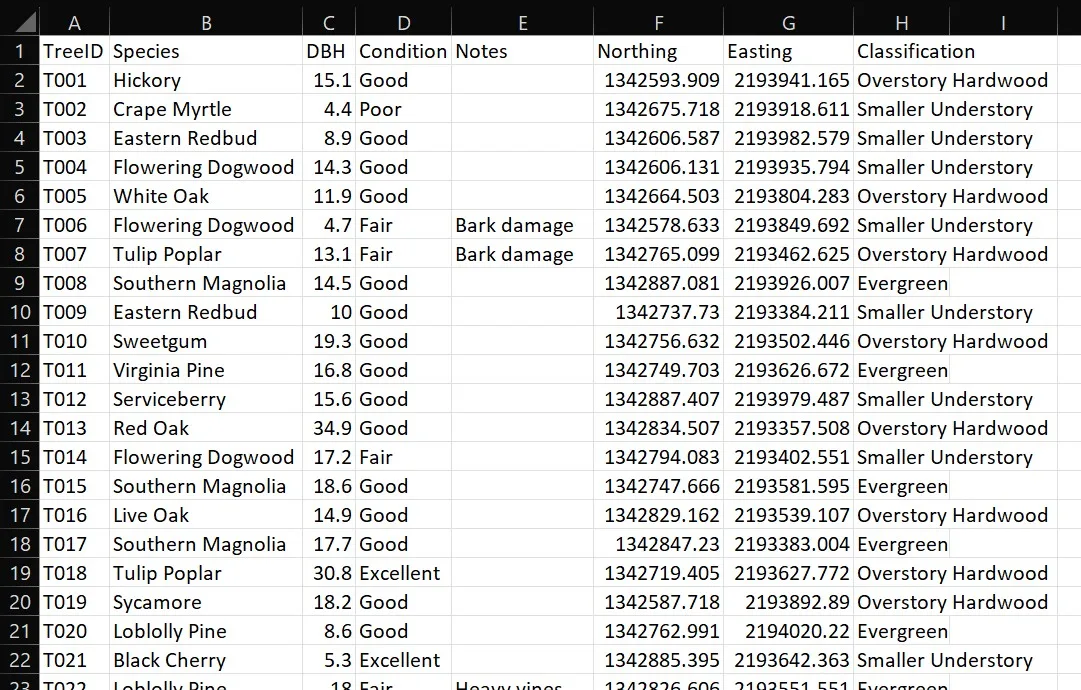
| Column | Purpose |
|---|---|
| Condition | Tree health: Excellent, Good, Fair, Poor, Dead, or Invasive |
| X, Y (or Easting, Northing) | Survey/state plane coordinates - for auto-placing trees |
| Latitude, Longitude (or Lat, Lon) | GPS coordinates - CanopyCode transforms to drawing coordinates |
| Notes | Any additional notes about the tree |
| Classification | Classification group label (e.g., Specimen, Heritage) |
What's Flexible
- Column headers are case-insensitive - treeid, TreeID, and TREEID all work
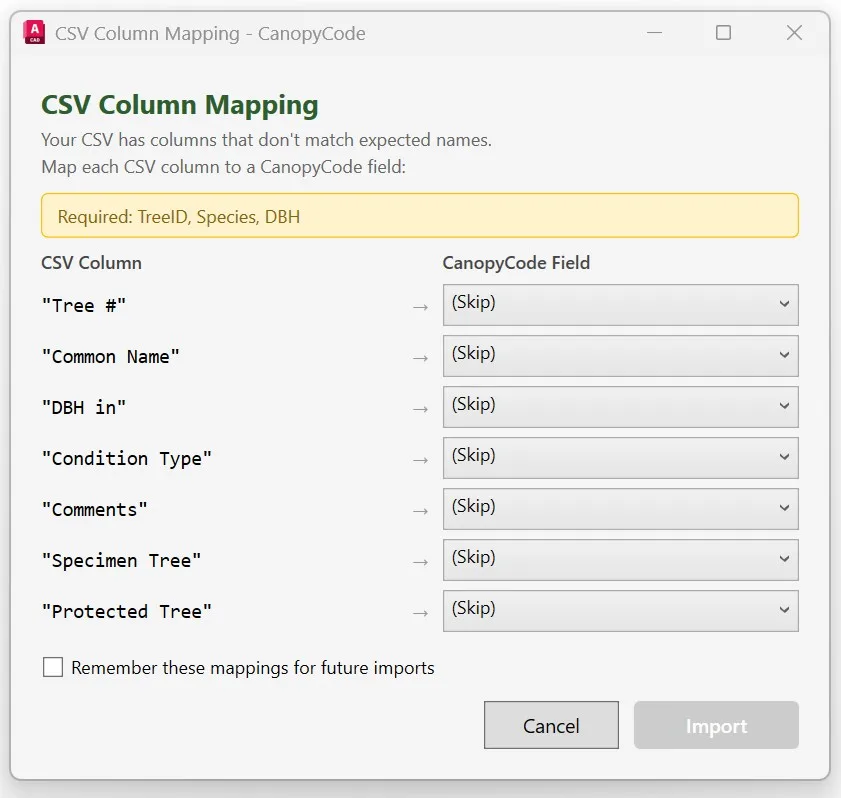
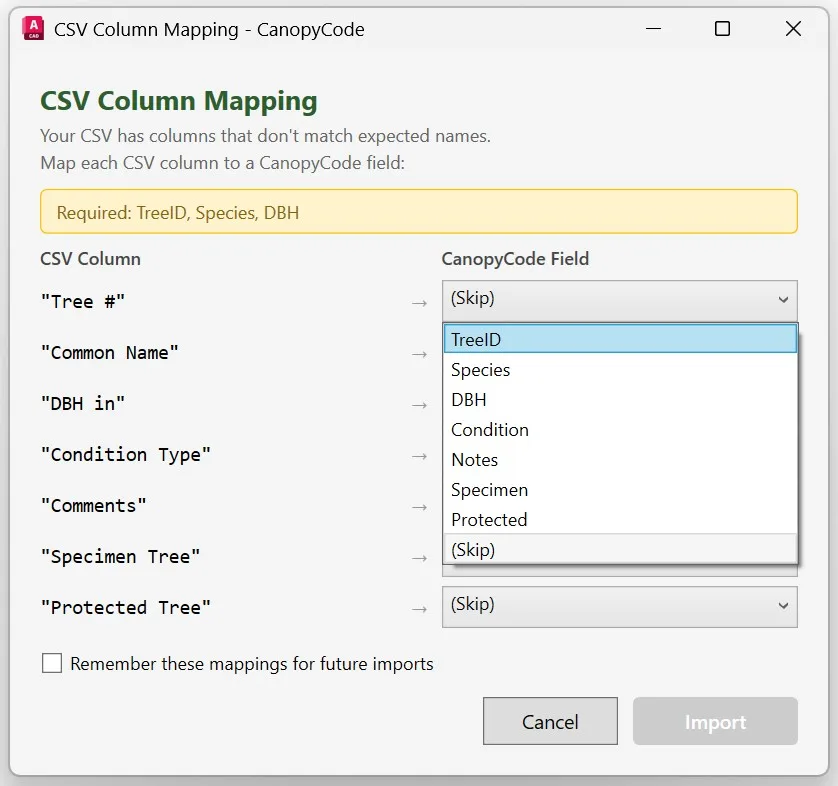
- Auto-mapping - CanopyCode recognizes common variations (e.g., DBH (in), Easting, Lat). If a column doesn't match, a mapping dialog lets you assign it manually
- Column order doesn't matter - put columns in any order
- Extra columns are fine - CanopyCode skips columns it doesn't need
- Coordinates are optional - if your CSV has X/Y or Lat/Long, trees place automatically. If not, use the manual placement workflow (Quick Start: Without Coordinates)
- Custom column names - if your CSV always uses different names (e.g., Tag instead of TreeID, Caliper instead of DBH), you can set permanent custom names in Configure (
CC_CONFIGURE) → Table Columns tab. Once set, CanopyCode auto-maps your columns every time - no manual mapping needed
Good to Know
- Each TreeID must be unique within the CSV
- DBH must be a positive number (trees without DBH are skipped with a warning)
- You can import multiple CSVs into the same project - use Manage Imports (
CC_MANAGE_IMPORTS) to view or remove sessions - Re-importing a CSV with existing TreeIDs updates those trees instead of duplicating them
Quick Start: With Coordinates
Your CSV has X/Y coordinates for every tree. This is the fastest path - eight steps from a blank drawing to a complete tree protection plan.
Phase 1: Create Your First Plan

Step 1 - Import CSV
Click Import CSV (CC_IMPORT_CSV) on the ribbon and select your tree survey file. CanopyCode reads the headers and auto-maps columns. If any columns don’t match, a mapping dialog lets you assign them manually.
Step 2 - Set LOD
Click Set LOD (CC_SET_LOD) and select the closed polyline(s) that represent your Limit of Disturbance. Use Add/Subtract mode to combine areas or exclude buildings. Press enter when done.
Step 3 - Set Property Line
Click Set Property Line (CC_SET_PROPERTYLINE) and select the property boundary closed polyline. Press enter when done.
Step 4 - Set ROW (if applicable)
Click Set ROW (CC_SET_ROW) and select right-of-way close polyline(s). Trees within the ROW get separate status tracking. Press enter when done.
Step 5 - Analyze
Click Analyze (CC_ANALYZE). CanopyCode auto-places trees from their CSV coordinates, calculates CRZ and SRP zones, determines saved/removed status based on impact thresholds, and routes everything to the correct layers.
Step 6 - Create Table
Click Create Table (CC_CREATE_TABLE) in the Reports panel. Select closed polylines for the sheet layout area (sheets should be at 10 scale for correct table sizing), then click to place. The table includes every tree with status, impact percentage, and subtotals by area.
Step 7 - Create Legend
Switch to paper space and click Create Legend (CC_CREATE_LEGEND). The legend shows symbols, colors, CRZ/SRP rules, and classification groups. You can add a Legend in model if you would like also.
Step 8 - Add Labels
Double-click into the viewport (model space), then click Label (CC_LABEL). Click on impact hatches or trees to add multileader labels showing TreeID, DBH, and status. You can add labels in model space as well.
That’s it. From CSV to completed tree processing for a tree protection plan.
Bonus Tips
- Find Tree (
CC_FIND_TREE) - type a TreeID and CanopyCode zooms straight to it. Great for reviewing specific trees from the table.

- Validate (
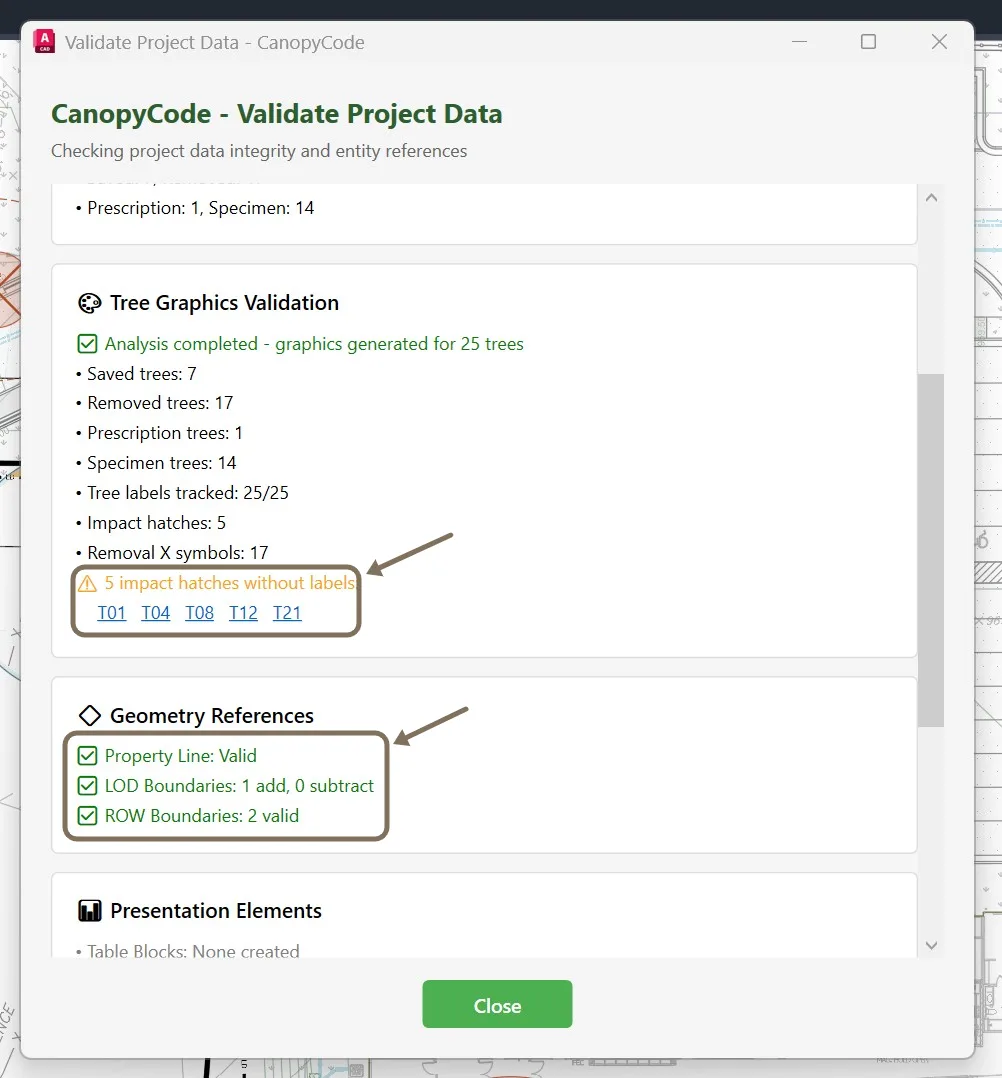
CC_VALIDATE) - checks your project for issues, including impact hatches that haven’t been labeled. Click the blue TreeID and it will zoom to that tree, after you label the impact hatch it will go away from this list on the Validate dialog window. Also in the Validate dialog window you can verify is the LOD, Property Line and ROW lines were set correctly under Geometry References.

Phase 2: The Update Loop
The plan is never static. When the LOD changes, everything updates with it.
Step 9 - Edit the LOD
Grip-edit the LOD polyline to change the disturbance boundary - drag vertices, add new ones, or reshape it.
Step 10 - Re-run Analyze
Click Analyze (CC_ANALYZE) again. All impact calculations, status assignments, and layer routing are recomputed automatically.

Step 11 - Regenerate All
Click Regenerate All which will use Regenerate Table (CC_REGENERATE_TABLE), Regenerate Legend (CC_REGENERATE_LEGEND), and Regenerate Labels (CC_REGENERATE_LABELS) to update your deliverables. They refresh in place with the new data.
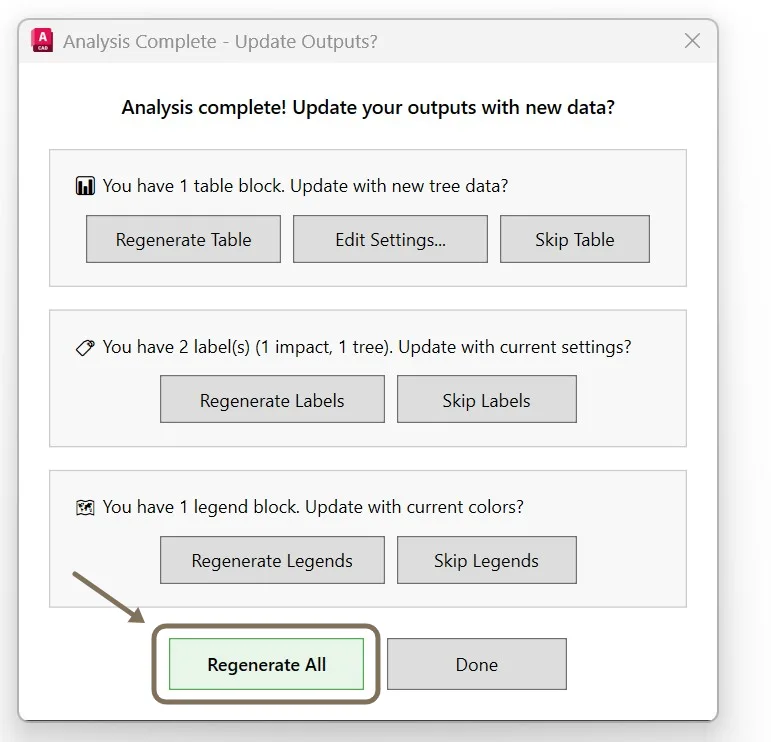
Change the LOD, re-analyze, regenerate - done.
Phase 3: Start Fresh with a New LOD
Need a completely different disturbance scenario? Start over without re-importing.
Step 12 - Clear LOD
Remove the current LOD selection by deleting the closed polyline or click Set LOD (CC_SET_LOD) again and then (C) to clear the Set LOD. Typing (C) and pressing enter clears it. Then it ask you to pick the new LOD. Also selecting a new closed polyline will reset the LOD to that new line if you don't want to clear the LOD.

Step 13 - Set New LOD(s)
Select different closed polylines(s) as your new Limit of Disturbance.

Step 14 - Analyze + Regenerate All
Run Analyze (CC_ANALYZE), then regenerate your table, legend, and labels. New plan generated from the same tree data.
Need a completely different disturbance scenario? Clear, redefine, analyze.
Quick Start: Without Coordinates
Your CSV has tree data (TreeID, Species, DBH) but no X/Y coordinates. No problem - use the tree sequencing workflow to place trees visually, then run the same analysis pipeline.
Step 1 - Import CSV
Click Import CSV (CC_IMPORT_CSV) and select your file. CanopyCode imports the tree data without placing anything in the drawing yet.

Step 2 - Add Tree Sequence
Click Add Tree Sequence (CC_ADD_TREE_SEQUENCE). CanopyCode walks through your imported trees one by one - showing you the TreeID, Species, and DBH. Click a location in the drawing for each tree. You can undo the last placement, skip a tree, or start over at any time.

Step 3 - Place Tree on Marker
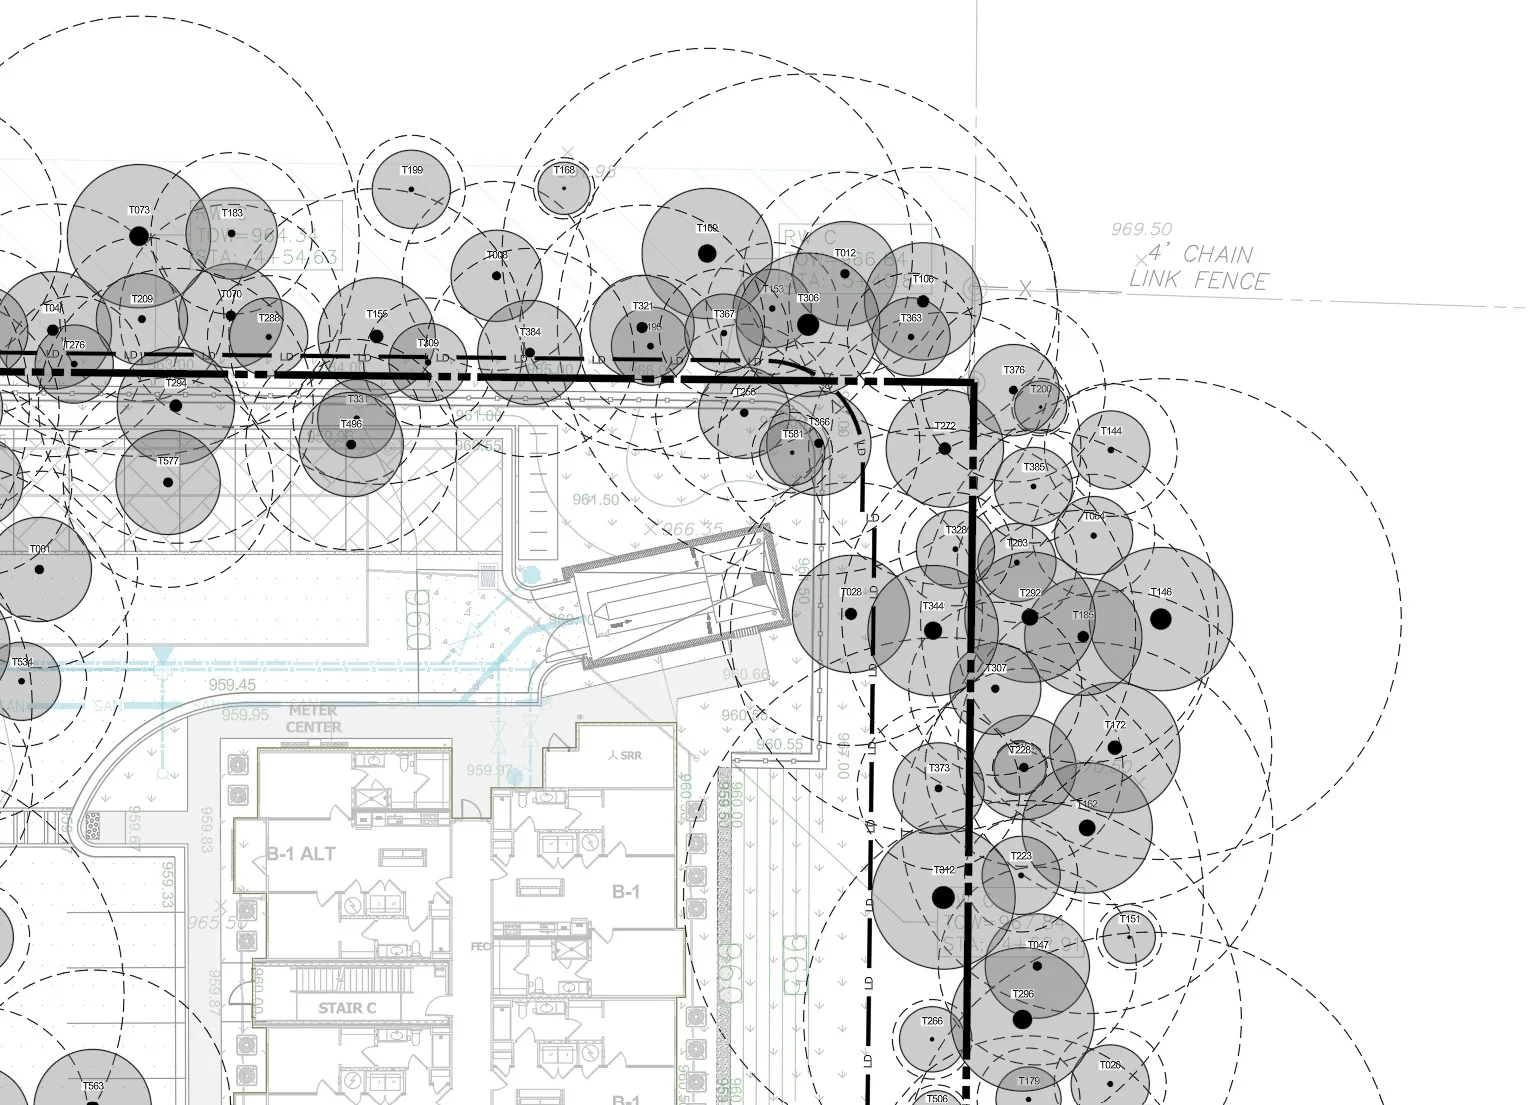
After sequencing, click Place Tree on Marker (CC_PLACE_TREE_ON_MARKER). CanopyCode draws CRZ and SRP circles around each placed marker, matching CSV data by TreeID.
Step 4 - Set LOD
Click Set LOD (CC_SET_LOD) and select your Limit of Disturbance polyline(s).
Step 5 - Set Property Line
Click Set Property Line (CC_SET_PROPERTYLINE) and select the property boundary.
Step 6 - Set ROW (if applicable)
Click Set ROW (CC_SET_ROW) and select right-of-way polylines. Trees within the ROW get separate status tracking.
Step 7 - Analyze
Click Analyze (CC_ANALYZE). Impact calculations run on the now-placed trees, determining saved/removed status and routing to layers.
Step 8 - Create Table → Create Legend → Add Labels
Same as Quick Start #1 - use Create Table (CC_CREATE_TABLE), Create Legend (CC_CREATE_LEGEND), and Label (CC_LABEL) to complete the plan.
Bonus Tips
- Find Tree (
CC_FIND_TREE) - type a TreeID and CanopyCode zooms to it. Helpful for verifying you placed trees in the right spots. - Validate (
CC_VALIDATE) - checks for issues including unlabeled impact hatches. Run before finalizing.
No coordinates? No problem. Place trees visually, then run the same workflow.
Classification Groups
← Back to Preparing Your CSV File
Classification groups let you flag trees that meet municipality-specific criteria - specimen trees, heritage trees, protected species, or any custom category. Each group has its own name, abbreviation, DBH thresholds, and layer colors. You can define up to five groups.
Setting Up a Classification Group
- Open Configure (
CC_CONFIGURE) (Setup & Configuration → Configure) - Go to the Classification tab
- Under Tree Classification Groups, click Add Group
- Enter a Group Name (e.g., “Specimen”) and Abbreviation (e.g., “S”)
- Add DBH Thresholds - for example: “Large Hardwood” ≥ 24″ DBH, “Softwood” ≥ 30″ DBH
- Optionally check Exclude Poor/Dead/Invasive conditions from this classification
- Click OK to save, then run Analyze
How Classification Connects to Your CSV
- Exact group name column - if your CSV has a column matching the group name (e.g., “Specimen”), CanopyCode auto-maps it
- Generic “Classification” column - used as a fallback for all groups
- Manual assignment - use the Edit Tree Data (
CC_EDIT_TREE_DATA) dialog to assign classifications individually
What Changes When a Group Is Active
- Trees matching the group get a classification label visible in tables and labels
- Trees route to group-specific layers (e.g.,
CC_Trees_Specimen_Savedinstead ofCC_Trees_Saved) - The table shows classification columns and subtotals
- The legend includes group-specific entries
Configuration Settings
Click Configure (CC_CONFIGURE) on the ribbon to open the settings dialog. Seven tabs control every aspect of how CanopyCode processes and displays trees. The dialog opens to the last-used tab.
Root Zone Rules
The Root Zone Rules tab controls how Critical Root Zones (CRZ) and Structural Root Plates (SRP) are calculated, and what impact thresholds trigger removal or prescription status.
Settings Reference
| Setting | Default | Description |
|---|---|---|
| CRZ Multiplier | 1.0 ft per inch DBH | Multiplier for calculating Critical Root Zone radius. A 24″ DBH tree with a 1.0 multiplier gets a 24 ft CRZ radius. |
| CRZ Terminology | “CRZ” / “Critical Root Zone” | Customizable name and abbreviation. Change to “TPZ” / “Tree Protection Zone” if your jurisdiction uses different terminology. |
| SRP Enable/Disable | Enabled | Toggle Structural Root Plate circles on or off. Some jurisdictions don’t use SRP. |
| SRP Terminology | “SRP” / “Structural Root Plate” | Customizable name and abbreviation for the SRP zone. |
| SRP Chart | Built-in DBH-to-radius lookup | Maps DBH ranges to SRP radii. The built-in chart follows industry standards; you can customize it for your jurisdiction. |
| Removal Threshold | 33% CRZ impact | Impact percentage at or above which a tree is classified as Removed. If the LOD encroaches on 33% or more of a tree’s CRZ, the tree is marked for removal. |
| Prescription Threshold | 20% CRZ impact | Impact percentage at or above which a tree gets a Prescription recommendation. Trees between 20% and 33% impact need an arborist prescription to determine if they can be saved. |
Note: If the SRP circle intersects the LOD boundary, the tree is automatically classified as Removed regardless of CRZ impact percentage.
Classification
The Classification tab controls tree classification groups, units calculation, and condition exclusions. This is where you define the municipality-specific rules that determine which trees qualify for special protection.
Settings Reference
| Setting | Default | Description |
|---|---|---|
| Classification Groups | None (up to 5) | Named groups with abbreviation and DBH thresholds per species type (e.g., Hardwood ≥ 24″, Softwood ≥ 30″). See the Classification Groups section for step-by-step setup. |
| Units Calculation Formula | DBH × 1.0 | Formula for calculating tree units used in mitigation/recompense calculations. Some jurisdictions use DBH squared or DBH × custom factor. |
| Units Factor | 1.0 | Multiplier for the units calculation formula. |
| Condition Exclusions | None | Exclude trees with Poor, Dead, or Invasive conditions from classification groups. Excluded trees won’t count toward classification even if they meet the DBH threshold. |
| PDI/Relocate Terminology | “PDI” / “Relocate” | Customizable terminology for these special status types. Some jurisdictions use “Pre-Development Impact” while others use “Existing Impact.” |
Drawing Standards
The Drawing Standards tab controls layer names, colors, and graphic options for all CanopyCode-generated objects. This is where you match CanopyCode’s output to your firm’s CAD standards.
Settings Reference
| Setting | Default | Description |
|---|---|---|
| Layer Names | CC_ prefix convention | Layer naming pattern for all CanopyCode layers. Layers are auto-created with names like CC_Trees_Saved, CC_Trees_Removed, CC_CRZ_Saved, etc. |
| Colors | Per status + area combo | Color assignment for each combination of status (Saved, Removed, Prescription) and area (Site, Boundary, ROW, Custom). Click any color swatch to customize. |
| Removed X Symbol | Enabled | Draws an X through the trunk circle of removed trees. Toggle off if your firm’s standard doesn’t use this symbol. |
| SRP Visibility | Visible | Show or hide SRP circles in the drawing. Some deliverables only need CRZ circles. |
| Color Mode | Color | Toggle between full color and black-and-white output. B&W mode uses linetypes and hatching to distinguish status instead of color. |
Text / Labels
The Text / Labels tab controls how tree labels and multileader annotations appear in the drawing.
Settings Reference
| Setting | Default | Description |
|---|---|---|
| Text Style | Standard | AutoCAD text style used for all CanopyCode labels. Select from text styles already defined in your drawing. |
| Text Size | Configurable | Label text height. Adjust based on your plot scale and readability requirements. |
| Arrow Settings | Standard | Multileader arrow style and size for label annotations. Affects the leader line that connects the label to the tree or hatch. |
| Background Mask | Optional | Adds a background mask (opaque box) behind label text so it’s readable when overlapping circles or hatching. |
| Auto-Rotate | Enabled | Automatically rotates labels so they’re always readable (not upside-down) regardless of viewport orientation. |
Legend
The Legend tab controls which sections appear in the generated legend and how it’s formatted.
Settings Reference
| Setting | Default | Description |
|---|---|---|
| Section Visibility | All visible | Toggle which legend sections appear - symbols, colors, CRZ/SRP rules, classification groups. Hide sections that aren’t relevant for a particular deliverable. |
| Formatting | Standard | Legend layout and formatting options. The legend respects your Drawing Standards settings (removed X symbol, SRP visibility, color mode) automatically. |
Import / Export
The Import / Export tab controls how CanopyCode reads survey data - including survey block matching for existing blocks in the drawing, and coordinate system settings for GPS-based imports.
Settings Reference
| Setting | Default | Description |
|---|---|---|
| Survey Block Mapping | Not configured | Block name hints and attribute tags (TREE_ID, DBH) for survey block matching. Configure this when your DWG already has survey blocks from the surveyor - CanopyCode reads the attributes to match blocks with CSV data. |
| Coordinate System (EPSG) | 2240 (Georgia West) | EPSG code for coordinate transformation. Used when importing GPS coordinates (Latitude/Longitude) - CanopyCode transforms them to the drawing’s coordinate system. |
| Lat/Long Toggle | Off | Enable GPS coordinate import. When on, CanopyCode looks for Latitude and Longitude columns in your CSV and transforms them using the configured EPSG code. |
Table Columns
The Table Columns tab controls which columns appear in the tree data table and how they’re presented.
Settings Reference
| Setting | Default | Description |
|---|---|---|
| Column Display Names | Standard names | Customizable header text for each table column. Rename columns to match your firm’s or jurisdiction’s terminology. |
| Column Visibility | All visible | Toggle which columns appear in the tree data table. Hide columns that aren’t relevant - for example, hide Classification columns if you’re not using classification groups. |
| Column Ordering | Default order | Drag-and-drop column reordering. Arrange columns in whatever order makes sense for your deliverable. |
Presets
Presets save your configuration so you can reuse settings across projects and share them with your team. Set up once per jurisdiction, then load instantly on every new project.
Two Preset Types
| Type | Extension | What It Saves |
|---|---|---|
| Municipality | .ccmun | CRZ/SRP rules, classification groups, thresholds, terminology - everything specific to a jurisdiction’s tree ordinance |
| Drawing Standards | .ccdraw | Colors, layers, label styles, table formatting - your firm’s CAD standards |
Saving a Preset
- Configure your settings for a jurisdiction (Root Zone Rules, Classification, etc.)
- Open Presets (inside the Configure dialog)
- Export to two locations:
- Project folder - keeps a copy next to the DWG for audit trail
- Shared folder - central location for your team (network drive, OneDrive, Dropbox)
Starting a New Project
- Open Configure → Presets → Import from your shared folder
- Load the municipality preset for your jurisdiction
- Optionally load a drawing standards preset for your firm’s standards
- Start working - all settings are pre-configured
Storage Locations
| Location | Path | Purpose |
|---|---|---|
| Local | C:\ProgramData\CanopyCode\Presets\ | This PC only |
| Project folder | Next to your .dwg file | Audit trail - settings travel with the project |
| Shared folder | Network drive, OneDrive, Dropbox, etc. | Team access - everyone loads the same settings |
The Ribbon (Overview)
The CanopyCode ribbon tab organizes all commands into five panels. Work left to right for the standard workflow - setup, trees, analysis, reports, utilities.

Panel Overview
- Setup & Configuration - Configure project settings, define LOD/ROW/property line/area boundaries
- Trees - Import CSV data, place trees (auto, manual, sequence, from blocks), edit tree data
- Analysis & Labels - Run analysis, create and regenerate labels
- Reports - Create tables, legends, and site info blocks
- Utilities & License - Help, validation, cleanup, import management, licensing
Each panel is detailed in the sections that follow.
Panel: Setup & Configuration
The Setup & Configuration panel is your starting point. Configure project settings and define the boundaries that drive the analysis.
Configure (CC_CONFIGURE)
Opens the seven-tab settings dialog where you control every aspect of how CanopyCode processes and displays trees. See the individual Configure tab sections above for detailed settings. The dialog opens to the last-used tab.
Set LOD (CC_SET_LOD)
Select the polyline(s) representing your Limit of Disturbance. This is the single most important boundary - it defines the construction impact area that determines whether each tree is saved or removed.
- Add mode - select additional polylines to expand the LOD area
- Subtract mode - exclude areas within the LOD (buildings, existing structures)
- Grip-edit - drag vertices to reshape the LOD after it’s set, then re-run Analyze (
CC_ANALYZE)
Set ROW (CC_SET_ROW)
Select right-of-way polyline(s). Optional - use when the site has a public right-of-way. Trees in the ROW get separate status tracking and appear in their own table rows.
Set Property Line (CC_SET_PROPERTYLINE)
Select the property boundary polyline. Used for area calculations and tree location context - trees are classified as Site (inside property), Boundary (on the line), or Co-Owned (outside property but with CRZ extending into it).
Set Area (CC_SET_AREA)
Define up to four custom named areas - easements, flood plains, stream buffers, wetlands, or any other zone. Each area gets a custom name and editable label. Trees in custom areas are tracked separately in the table and on their own layers.
Panel: Trees
The Trees panel handles all tree data - importing from CSV, placing trees in the drawing, and editing tree attributes.
Import CSV (CC_IMPORT_CSV)
Import tree survey data from a CSV file. Required columns: TreeID, Species, DBH. Optional columns: Condition, X/Y coordinates, Lat/Long, Notes, Classification.
- Column headers are case-insensitive - CanopyCode maps common variations automatically
- If headers don’t match, a column mapping dialog lets you assign them manually
- Multiple imports supported - use Manage Imports to view or remove specific sessions

Add Tree Marker (CC_ADD_TREE_MARKER)
Place blank survey markers by clicking locations in the drawing. Markers are numbered automatically. Use before Place Tree on Marker (CC_PLACE_TREE_ON_MARKER) when you want to position markers first, then match them with CSV data.
Place From CSV (CC_PLACE_FROM_CSV)
Auto-place all imported trees that have X/Y or Lat/Long coordinates. Each tree is placed at its survey coordinates with CRZ and SRP circles drawn immediately.
Add Tree Manual (CC_ADD_TREE_MANUAL)
Place a single tree by clicking a location and entering its TreeID. If the tree exists in your import data, CanopyCode uses that data automatically. If not, it prompts for DBH and optional details.
Place Tree on Marker (CC_PLACE_TREE_ON_MARKER)
Match CSV data to existing survey blocks in the drawing. Select survey blocks - CanopyCode reads the TreeID from block attributes, matches with your CSV import, and draws CRZ/SRP circles around each block. Requires Survey Block Mapping configured in Configure (CC_CONFIGURE) Import/Export tab.
Add Tree Sequence (CC_ADD_TREE_SEQUENCE)
Guided sequential placement - the fastest way to place trees when your CSV has no coordinates. CanopyCode walks through imported trees one by one, showing TreeID, Species, and DBH. Click a location in the drawing for each tree.
- Undo - undo the last placement
- Skip - skip the current tree
- Start over - restart the sequence from the beginning
Edit Tree Data (CC_EDIT_TREE_DATA)
Opens a spreadsheet-style dialog showing all trees. Edit species, DBH, condition, status, and classification for any tree. The Reset-to-calculated button (⚡) restores the computed status if you want to undo a manual override.
Panel: Analysis & Labels
The Analysis & Labels panel runs the core calculation engine and creates annotations.
Analyze (CC_ANALYZE)
The heart of CanopyCode. Analyze computes impact and routes every tree to the correct layers. Run this after any change - moved polylines, changed settings (CC_CONFIGURE), added trees.
What Gets Calculated
| Calculation | How It Works |
|---|---|
| CRZ radius | DBH × CRZ multiplier (default: 1.0 ft per inch DBH) |
| SRP radius | Looked up from the SRP chart by DBH range |
| CRZ impact % | Percentage of CRZ area that falls within the LOD |
| Status | Determined by impact % and SRP intersection (see thresholds in Root Zone Rules) |
| Area context | Site, Boundary, Co-Owned, or Right-of-Way based on property line and ROW |
| Classification | Matched against classification group thresholds |
| Units | DBH × units factor (for mitigation/recompense calculations) |
Status Determination
| Condition | Status |
|---|---|
| SRP intersects LOD boundary | Removed |
| CRZ impact ≥ removal threshold (default 33%) | Removed |
| CRZ impact ≥ prescription threshold (default 20%) | Prescription |
| CRZ impact < prescription threshold | Saved |
| No LOD defined (existing conditions mode) | Existing |
Label (CC_LABEL)
Create multileader labels by clicking on impact hatches or trees. Labels show TreeID, DBH, and status. Labels auto-rotate for readability and support optional background masks. Work in model space - double-click into the viewport from paper space.
Regenerate Labels (CC_REGENERATE_LABELS)
Updates all existing labels with current settings and data. Use after re-analysis or after changing label settings in Configure (CC_CONFIGURE) → Text / Labels. Labels refresh in place - no need to delete and recreate them.
Panel: Reports
The Reports panel generates deliverable outputs - tree data tables, symbol legends, and site area summaries.
Table Commands
Create Table (CC_CREATE_TABLE) - Select closed polylines for the sheet layout area (sheets should be at 10 scale for correct table sizing), then click to place. The table lists every tree with status, impact percentage, units, and subtotals by area and classification. Column configuration is in Configure (CC_CONFIGURE) → Table Columns.
Edit Table (CC_EDIT_TABLE) - Change table options (columns, sorting, formatting) and regenerate in place.
Regenerate Table (CC_REGENERATE_TABLE) - Refresh table data without changing options. Use after re-analysis to update values.
Export to CSV (CC_EXPORT_TABLE_TO_CSV) - Save analyzed tree data (with status, impact %, units) to a spreadsheet-ready CSV file.
Legend Commands
Create Legend (CC_CREATE_LEGEND) - Place in paper space. Shows symbols, colors, CRZ/SRP rules, and classification groups. The legend respects your Drawing Standards settings (removed X symbol, SRP visibility, color mode) automatically.
Edit Legend (CC_EDIT_LEGEND) - Change legend visibility and formatting options, then regenerate.
Regenerate Legend (CC_REGENERATE_LEGEND) - Refresh legend colors and content after settings changes.
Site Info Commands
Create Site Info (CC_CREATE_SITE_INFO) - Place an area summary block showing property area, LOD area, and custom area sizes.
Edit Site Info (CC_EDIT_SITE_INFO) - Customize area labels and which areas appear.
Regenerate Site Info (CC_REGENERATE_SITE_INFO) - Recalculates area sizes after polyline changes.
Panel: Utilities & License
The Utilities panel provides project management, validation, and licensing commands.
Help (CC_HELP) - Opens the help dialog with a quick-reference for all commands.
Settings (CC_SETTINGS) - Read-only view of your current configuration settings, license status, and version information.
Validate (CC_VALIDATE) - Checks your project for integrity issues - missing data, duplicate TreeIDs, unlabeled impact hatches, inconsistencies between trees and analysis results. Run before finalizing any deliverable.
Clear Outputs (CC_CLEAR_OUTPUTS) - Selectively clear tables, legends, labels, site info, or graphics. Choose exactly what to remove without affecting other outputs.
Manage Imports (CC_MANAGE_IMPORTS) - View all imported CSV sessions and optionally remove trees from a specific import.
Reset Project (CC_RESET_PROJECT) - Removes all tree data, analysis results, and outputs. Keeps your configuration settings. Use when starting completely over on the same drawing.
Recover Data (CC_RECOVER_DATA) - Recover data from backup or corrupted state. Last resort for when something goes wrong.
Command-Line Only
These commands are typed at the AutoCAD command line - they don’t have ribbon buttons.
CC_FIND_TREE- Type a TreeID and CanopyCode zooms directly to it. Essential for large projects with hundreds of trees.CC_CHECK_UPDATES- Check for newer CanopyCode versions.CC_ACTIVATE- Enter your license key. Includes a 7-day offline grace period.CC_DEACTIVATE- Remove the license from this machine to free up a seat.CC_LICENSE- Display current license info and status.
Troubleshooting
Common issues and how to fix them.
| Problem | Solution |
|---|---|
| Ribbon tab doesn’t appear after installation | Type NETLOAD at the command line, browse to CanopyCode.AutoCAD.dll, and load it manually. The tab should appear immediately. |
| Trees not placing from CSV | Check that your CSV has X/Y or Lat/Long columns with valid numeric coordinates. If using Lat/Long, make sure the Lat/Long toggle is enabled in Configure (CC_CONFIGURE) → Import / Export. |
| CRZ circles seem the wrong size | Check the CRZ Multiplier in Configure (CC_CONFIGURE) → Root Zone Rules. The default is 1.0 ft per inch DBH. Also verify that DBH values in your CSV are in inches. |
| Tables not fitting on sheets | Make sure sheets are at 10 scale. Select closed polylines for the sheet layout area - the table sizes to fit within those boundaries. |
| Legend missing classification entries | Run Regenerate Legend (CC_REGENERATE_LEGEND) after adding or changing classification groups. The legend only updates when regenerated. |
| Labels not updating after re-analysis | Run Regenerate Labels (CC_REGENERATE_LABELS) (not just Analyze). Analysis recalculates data; Regenerate Labels updates the label text. |
| “Impact hatches not labeled” in Validate | Use Label (CC_LABEL) and click on the flagged hatches to add labels. Validate (CC_VALIDATE) identifies which hatches still need annotation. |
| License activation fails | Check your internet connection. If you’re offline, CanopyCode has a 7-day grace period - you can keep working and activate later. |
| Undo doesn’t work as expected | Each CC_ command is a single undo step. Press Ctrl+Z to undo the last CanopyCode command completely. |
Need a hand the guide doesn't cover? Contact support, or see the changelog for what's new.